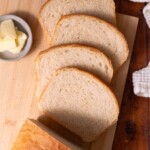
Sourdough Sandwich Bread
Buttery, tender, and chewy with classic sourdough flavor and a soft crust. This beginner-friendly sandwich bread is the perfect everyday loaf.
Servings: 1 loaf
Equipment
- 9x5 inch loaf pan
- Stand mixer with dough hook
Ingredients
- 2 ounces (4 tbsp) unsalted butter
- ¾ cup water
- ¼ cup whole milk
- 3 tablespoons (28 grams) brown sugar
- 1 ½ teaspoons (11 grams) salt
- 100 grams active sourdough starter
- 510 grams bread flour
- 1 tbsp melted butter for top after baking
Instructions
- Warm the liquids: In a small saucepan, melt the 2 oz butter. Turn off heat and add ¾ cup water and ¼ cup whole milk, stirring to combine. The liquids should be warm to the touch, about 100° F. If they’re not, turn the heat back on low and continue heating until warm. If they're too hot, allow them to sit until cool.
- Add remaining ingredients: Pour milk mixture into the bowl of a stand mixer and add 3 tbsp brown sugar and 1 ½ tsp salt, whisking to combine. Whisk in 100 grams sourdough starter, then 510 grams bread flour, and fold everything together until blended.
- Knead: Attach a dough hook to your stand mixer and knead bread dough on medium speed until dough is smooth, elastic, and pulls away from the bottom and sides of the bowl, about 7-10 minutes. The dough should pass the windowpane test*.
- Ferment overnight: Place the dough in an oiled bowl, turning to coat. Cover and leave to ferment overnight at room temperature.
- Prepare pan: Butter the bottom and sides of a 9x5-inch loaf pan. For easiest removal after baking, line the bottom and long sides of the pan with parchment paper.
- Shape: Place dough on a lightly floured work surface and dust the top of the dough with a little flour. Use floured hands or a rolling pin to gently roll and press the dough out into a square, roughly 12x12 inches (it doesn’t need to be perfect, just make sure it’s a little longer than your loaf pan). On the two sides that are parallel to you, fold about an inch of dough in over itself, pressing gently to adhere. Roll dough into a tight log, starting from the side closest to you. Pinch the seams shut and place dough in the prepared pan.
- Proof: Cover the dough and let it rise in a warm place until airy and noticeably less dense. It should rise ½ -1 inch above the lip of the pan. This may take anywhere from 2-6 hours. In my house at 68° F, it takes about 4 hours.When the bread is ready, preheat the oven to 375° F.
- Bake: Place bread in preheated oven and bake until golden on top and cooked in the middle, about 45-55 minutes. The internal temperature of the bread should read 200-210° F.Brush top of bread with 1 tbsp melted butter and allow bread to cool at least 15 minutes in the pan, then remove and place on a cooling rack to finish cooling. Let bread cool for at least an hour before slicing and serving.
Notes
*Windowpane test: For more info (and images!), see the step-by-step instructions in the post above.
Baking tip: I like to place a second inverted loaf pan on top of the bread pan for the first 20 minutes of baking. Then I continue baking without the "lid". This creates steam and helps the bread rise at the beginning of bake time. It's optional, but I recommend it if you have an extra loaf pan!