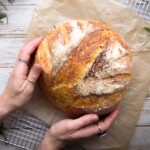
Rosemary Sea Salt Sourdough
My all-time favorite bread—fragrant rosemary, crunchy sea salt, and a perfect sourdough texture. Amazing for avocado toast, soups, and more!
Servings: 1 loaf
Equipment
- Dutch oven with lid optional but recommended
Ingredients
- 2 tablespoons fresh rosemary chopped fine
- 8 grams fine sea salt
- 3 grams Maldon flakes or other high-quality flaky sea salt
- 150 grams active, bubbly sourdough starter
- 310 grams warm water
- 25 grams high-quality olive oil
- 500 grams bread flour
- Extra olive oil and coarse sea salt, for after baking
Instructions
Mixing day (day 1):
- Make rosemary salt: Mix 2 tbsp chopped rosemary, 8 grams fine salt, and 3 grams coarse sea salt.
- Mix dough: In a large bowl, whisk together 150 grams sourdough starter, 310 grams water, and 25 grams olive oil with the rosemary salt until well combined. Stir in 500 g bread flour. Finish mixing by hand, folding mixture until it forms a rough, shaggy ball. Cover with plastic wrap or a damp towel and let rest 30-45 minutes.
- First stretch and fold: Over the next few hours, you'll give the dough a stretch & fold about every 30-45 minutes or so. Plan to stretch & fold four total times.To stretch the dough, pull dough upwards from one side and give it a long stretch, then fold the dough back to the middle. Turn the bowl a quarter turn, stretch again and fold back to the middle. Repeat all the way around the dough for a total of 4-5 times. Then cover the dough back up, and allow to rest again until the next stretch & fold.
- Continue with stretch and folds: Continue stretching and folding the dough every 30-45 minutes until the dough is smooth, elastic, and hydrated.
- Continue bulk fermentation: Once you've completed all the stretches, let the dough rest and continue to ferment for another 1-3 hours. The dough should rise 30-50% (NOT double). It will jiggle if you shake it, and should look lightly puffy and aerated, with a few bubbles on the surface.
- Shape: Line a large bowl with a tea towel and dust the towel lightly with flour (or use a banneton). Gently dump your dough out onto a lightly floured surface. Fold the edges of the dough toward the center, working your way around until it forms a rough ball. Flip it seam-side down, then use your hands or a bench scraper to pull it toward you, rotating as you go, until the surface is smooth and taut.Place dough, seam side up, into the towel-lined bowl. Cover and place in the fridge to rest overnight.
Baking day (day 2):
- Prep: Preheat oven to 450° F.
- Bake: When oven comes to temperature, carefully turn your dough onto a piece of parchment, seam side down. Score the dough with a bread lame or very sharp knife in any desired pattern. Lift the parchment paper with your sourdough and lower it into a Dutch oven. Place the lid on and bake, covered, for 25 minutes.Remove lid from dutch oven and continue to bake uncovered for another 18-25 minutes, or until bread is golden and cooked through. The best way to tell if bread is done is to take its temperature with a digital thermometer - it should be between 205 - 215° F.
- Brush with oil & salt: Remove from oven and gently lift bread out of Dutch oven, using the parchment paper as handles. Allow to cool for 5-10 minutes, then brush liberally with more high-quality olive oil and sprinkle all over with coarse sea salt.
- Cool: Allow the sourdough loaf to cool completely before slicing - if you slice into it too early, you could end up with a gummy texture! It should rest for at least an hour before you slice it.